I was looking for a VPN solution in order to securely manage my services over the internet – so I tried WireGuard this time and I really like it. In this post I’ll show you how to install WireGuard on Ubuntu.
Introduction
I have used OpenVPN for more than ten years. This time however, I wanted to avoid it if possible and instead use something simpler and faster. I wanted to try WireGuard ever since it was merged into the Linux kernel, even more when I read about clients for Windows, macOS, iOS and Android.
The WireGuard homepage perfectly summarises its advantages:
WireGuard® is an extremely simple yet fast and modern VPN that utilizes state-of-the-art cryptography. It aims to be faster, simpler, leaner, and more useful than IPsec, while avoiding the massive headache. It intends to be considerably more performant than OpenVPN. WireGuard is designed as a general purpose VPN for running on embedded interfaces and super computers alike, fit for many different circumstances. Initially released for the Linux kernel, it is now cross-platform (Windows, macOS, BSD, iOS, Android) and widely deployable.
https://www.wireguard.com/
The server part
First you should update your package lists and then install the required packages:
# sudo apt update
# sudo apt install wireguard
This will install two other packages containing the kernel modules and userspace tools (wireguard-modules, wireguard-tools).
Generate server keypair
With WireGuard, each participant has a public / private key pair which we are going to create now:
# sudo -i
# cd /etc/wireguard/
# umask 077; wg genkey | tee privatekey | wg pubkey > publickey
‘umask 077’ makes sure that the files created are only readable by the owner. We will have the private and public key in two separate files:
/etc/wireguard# ls -l
 total 12
 -rw------- 1 root root   45 Dec 10 17:45 privatekey
 -rw------- 1 root root   45 Dec 10 17:45 publickey
Then we need the content of those files, so we will output its content:
/etc/wireguard# cat privatekey
XX_this_hosts_private_key_XXXXXXXXXXXXXXXXX=

/etc/wireguard# cat publickey
XX_this_hosts_public_key_XXXXXXXXXXXXXXXXXX=
Create server config
The server configuration is composed of an interface part and one or more peer parts.
The [Interface] part contains the configuration for the local host (the server in that case) and includes at least the following settings:
- Address: the private IP address of the local host within the VPN
- PrivateKey: the private key of the local host (see /etc/wireguard/privatekey)
- ListenPort: the port WireGuard should use (default: 51820)
Under [Peer] we define the clients which should connect to the server. Before we can define our first peer we need its public key. Which is why this part needs to be completed later.
#### Settings for this host
# You should at least configure the following settings:
#   - Address:
#       the IP address this host will use within the VPN
#   - PrivateKey:
#       the private key from this host
#       (see /etc/wireguard/privatekey )
#   - ListenPort:
#       the port where Wireguard will listen for incoming
#       packets (optional)
[Interface]
Address = 10.0.0.1/24
PrivateKey = XX_this_hosts_private_key_XXXXXXXXXXXXXXXXX=
ListenPort = 51820

#### Settings for peers
# For each peer that will connect to this host a PublicKey and
# AllowedIPs have to be configured:
#   - PublicKey:
#       the public key of the client. Generate a key pair on the
#       client; just copy the PublicKey
#   - AllowedIPs:
#       the IP(s) that the client will use within the VPN (note
#       the /32 subnet)
[Peer]
PublicKey = XX_peer1_public_key_XXXXXXXXXXXXXXXXXXXXXXX=
AllowedIPs = 10.0.0.10/32

[Peer]
PublicKey = XX_peer2_public_key_XXXXXXXXXXXXXXXXXXXXXXX=
AllowedIPs = 10.0.0.11/32
Hint: You can leave the comments in the files to have some inline documentation for future changes.
Enable and start the service
To enable the wireguard service and start it right now:
# sudo systemctl enable wg-quick@wg0
# sudo systemctl start wg-quick@wg0
To check its status:
# systemctl status wg-quick@wg0
● wg-quick@wg0.service - WireGuard via wg-quick(8) for wg0
     Loaded: loaded (/lib/systemd/system/wg-quick@.service; enabled; vendor preset: enabled)
     Active: active (exited) since Wed 2021-01-06 23:10:59 CET; 1 weeks 1 days ago
       Docs: man:wg-quick(8)
             man:wg(8)
             https://www.wireguard.com/
             https://www.wireguard.com/quickstart/
             https://git.zx2c4.com/wireguard-tools/about/src/man/wg-quick.8
             https://git.zx2c4.com/wireguard-tools/about/src/man/wg.8
    Process: 494 ExecStart=/usr/bin/wg-quick up wg0 (code=exited, status=0/SUCCESS)
   Main PID: 494 (code=exited, status=0/SUCCESS)
Firewall
If you are using a firewall – you should if the server is on the internet – you have to open a port for Wiregurad. Ubuntu uses UFW by default. To open a port enter (use the ListenPort defined earlier):
# sudo ufw allow 51820/udpThe client part
WireGuard supports a wide range of devices and operating systems (see list). Each client that wants to connect to the VPN needs a config that is similar to the server config:
- The ‘Interface’ part – again defines the config for the local host (the client in this case).
- PrivateKey: the private key of the client
- Address: the IP address the client should use within the VPN
- Peer – defines the server to connect to
- PublicKey: the public key of the server
- AllowedIPs: the IPs that are allowed to arrive from this peer
- Endpoint: the servers public IP address + Wireguard port
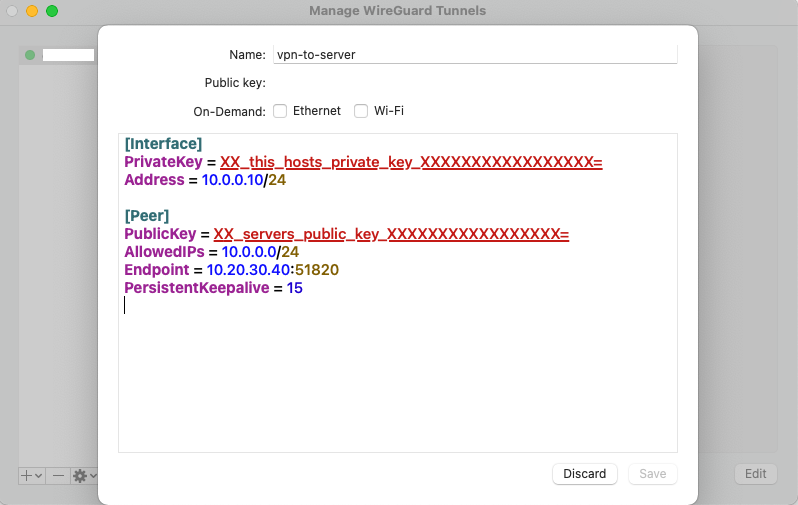
[Interface]
PrivateKey = XX_this_hosts_private_key_XXXXXXXXXXXXXXXXX=
Address = 10.0.0.10/24

[Peer]
PublicKey = XX_servers_public_key_XXXXXXXXXXXXXXXXX=
AllowedIPs = 10.0.0.0/24
Endpoint = 10.20.30.40:51820
When you have finished the client config, you have to add the clients public key to the server config and restart the service. Then you should be able to establish a connection with the client.
MacOS client
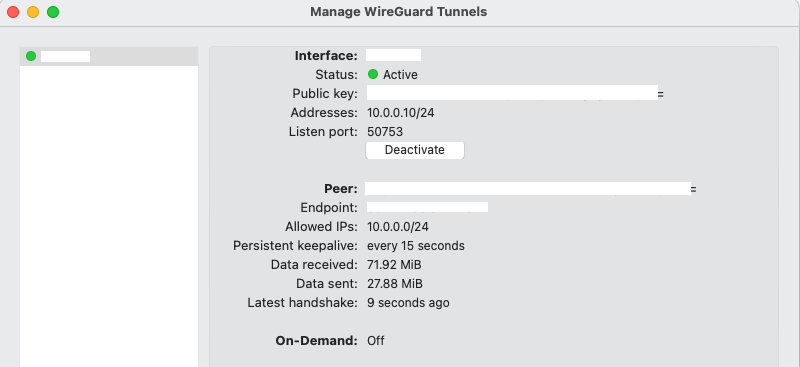
As an example I will show you the configuration dialog of the MacOS client. This client will automatically create a key pair for you, so you only have to add the remaining bits from above.
When both sides are configured correctly you should be able to connect successfully.
More information
For more information about Wireguard I would advice you to check out the following links:
- Official homepage – Links to all clients and a quick start guide
- Unofficial documentation – Lots of information and examples
Comparison with OpenVPN
I have used OpenVPN since more than ten years. However, I wanted to avoid it for multiple reasons:
- Client support is not ideal. For example on MacOS Big Sur you need to deactivate System Integrity Protection (“SIP”) in order to get Tunnelblick to work (using tap).
- I don’t like the authentication methods it offers – I didn’t want to create a PKI just for VPN. The pre-shared key method is too simple for my taste and also is not practical if you have many users. And the user/pass method needs an external auth service.
- It always took me multiple attempts to copy the config to a new client, adapt the paths to the certificates and get some client to work.
- The configuration is rather complicated.